
When we purchased our home in 2013; it was at the bottom of the market. So much so- that the previous owners of this house did not finish their addition to the garage/great room above the garage. The builders sold it to a Graduate Student, who in turn sold it to Sam and I.
We knew we wanted a home improvement project… but had no clue as to what was in store for us. This house of ours sucks up every last penny in our budget. But we are getting SO close to being finished now!!
We affectionately named this great bare room Valhalla, and it started as an empty shell.
The steps we’ve taken to finish this room includes: framing in walls,

Installing insulation

And attic soffits,

wiring lights and outlets,

installing drywall, using a drywall jack,

mudding and texturing,

painting and installing molding, (see my post on my master bedroom painting and molding)
building closet storage (check out our awesome Walnut closet built ins!)
and we now come to the beginning of the end of our 460 sqft living room.
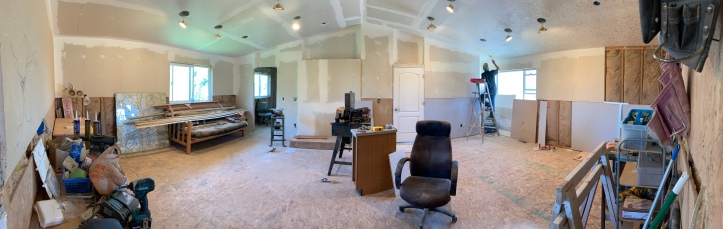
Here are some progress photos over the past month:
Sam began texturing the ceiling on July 14th:
The texturing was almost complete and we added the last of the drywall around the walls on July 19th:
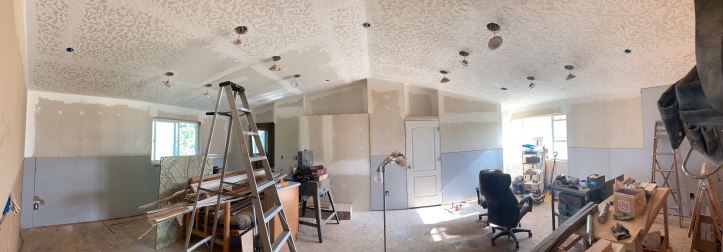
And after taping, and level 5 mudding the walls, sanding, painting the ceiling(and installing 1 last door) we are brought to this place today, August 12th:

After years of periodic work on this room, we can see the end in sight! Our goal within the next few months is:
- Finish sanding
- Prime the walls
- Paint the walls (2 tones of gray)
- Install a built-in window bench under the window on the right side
- Install built in shelving between the two doors
- Install floating shelves on the large right wall
- Start installing the chair rail and crown molding
Begin the Bathroom:
- Find 2 matching vanities
- Purchase and Install toilet
- Purchase and Install mirrors
- Install returns to the septic tank
- Finish plumbing the water
- Hang drywall/cement board
- Tile the bathtub
And the very last step for the entire room:
Install flooring!
I hope to achieve all of these tasks by the end of the year. Think we can get it done?
Wish us luck!
With Love, Erika Nora

Woohoo! You guys are on a roll, that room is incredible! My favorite part of a remodel is drywall and paint, so I can’t wait to see it all done, great work you two!
LikeLiked by 1 person
We need you in our midst! Sounds like you’d be having fun around here right now. What do you like about drywall? And of course you would like the paint, eh?
LikeLiked by 1 person
I wish I could be there to help! It’s been years, but I loved spreading the compound over the joints and making them perfectly smooth, so satisfying! My Dad was a general contractor and I loved learning from him on the jobs sites!
LikeLiked by 1 person
I know what you mean. The mudding is about done now, and I think we may be on the painting and trim this weekend!
LikeLike
Good Luck! What a big job you have taken on, cant wait to see it done.
LikeLiked by 1 person
Thanks you Denise! I really enjoy browsing your blog in hopes our finished product may look as beautiful as your home!
LikeLike
That’s so sweet of you!!! Aww ☺️ I appreciate you visiting me little blog.
LikeLiked by 1 person